| Socknitters Home Page | Cybersocks Home Page |
| Introduction | Lesson 1 | Lesson 2 | Lesson 3 | Lesson 4 |
Cybersocks
2
Socks on 2 Circulars
Instructor: Sheron Goldin
Feel
free to ask Sheron questions on the socknitters
list or contact Sheron directly
![]()
Lesson Two - Let's Knit!
Welcome back. Hope you are ready to start. You should have with you 2 circular needles, size 5 (or size to give you a gauge of 5 stitches per inch), worsted weight wool, and a ruler.
I have chosen a medium child�s sock so you will be able to complete the homework before the next class.
For a sock you want a stretchy cast on so that it will go over your foot and up your leg. For this reason a long tail cast on is recommended. Some people have reported that the Twisted German Cast on stretches more so feel free to use that cast on also. I will not give directions on how to do the cast on as I am not doing this as a beginning knitting class. There are many sites on the web that show these cast-ones (such as: http://knitting.about.com/library/bltgcaston.htm?terms=German+Twisted+Cast+O ) and feel free to ask for help if you need it. Now let�s get started:
Cast on 32 stitches on one of the circular needles (picture 1).

Picture 1
Slide ½ of the stitches (16 stitches) onto one end of the other needle (picture 2). The end of the needle you are working with is in your hand and the other end is hanging loose.
Picture 2Hold the two needle tips with the cast on stitches in you left hand with the tips between your thumb and first finger and the stitch area is across the palm of your hand. The two groups of cast on stitches will be joined so that the needles seem to form a sideways �U� shape with the closed end near the tip of the needles and the open end goes up the cable of the needles. (Picture 3)
Picture 3Slide the stitches to the other end of the needles so that the open end is towards your right and the last stitch you cast on is on the top. The joined part of the cast on should be towards the center of the �U� (picture 4).


Picture 4
Before joining your stitches into a round take a moment and put the stitch marker in place. Slip the first cast on stitch (the one without any ends coming off of it) off the needle (but don�t let go), slip the stitch marker on the needle then the first cast on stitch back onto the needle. This helps to assure that the correct group of stitches for the second sock is on this needle. It will also mark the beginning of the round when working the cuff and leg.
Make sure your stitches are not twisted and are laying flat with the stitches pointing out and the joined area is facing in (if taken off the needles it would look somewhat like a daisy) then join as you choose. Don�t know which way to join? Try each of the methods listed next until you find one that works for you.
There are many ways to join your stitches to form a ring. Some people just start knitting on the first stitch, making sure that the stitches are close together, others will cast on an extra stitch and knit the first and last stitch together (if you choose to do this move the last stitch cast on from the top needle to the bottom needle now). In Cat�s book she recommends moving the last stitch cast on from the top needle to the bottom needle. Then putting your needle tip through the stitch just moved, catching the first stitch you cast on and pull this stitch through the last stitch and place it onto the top needle. You can also use a crochet hook to move the stitches.
In a hat knitting class I recently attended the instructor suggested just pulling the loose tail left from the cast on through the first stitch as if to knit and tying a knot to hold the stitches together. Do pull the stitches close together if you are going to do this. Picture 5 shows the stitches joined into a circle with the marker showing me where I will start knitting.

Picture 5
Now to cast on for the second sock: hold onto the needle with the stitch marker on it and go to the other end of the needle (where you cast on the first sock). Now cast on 32 stitches with either the other end of the skein of yarn or an end from the other skein of yarn (picture 6).
Picture 6
Again slide half of the stitches onto the other needle


Picture 7
If you are pulling the tail through the first stitch move the stitches to the cable part of the needle and pull the tail through now (picture 7). If you will be just pulling the knitting tightly you also will move the stitches to the cable part of the needle at this time and continue on.
If you have cast on an extra stitch that you will be knitting together with the first stitch or if you are joining as Cat Bardi recommends you have another step to do � moving the sock you have just cast on to the other side of the first cast on sock. You will be slipping the stitches on needle A from A1 to A2 and on needle B from B1 to B2. Here is what you do: hold your needle ends where the stitches are joined in your right hand, last cast on stitch on the top and first cast on stitch on the bottom, grab the other tip of one of the needles and slide the proper group of stitches onto the needle (then do the same with the other circular needle) so that the second cast on sock ends with the open area facing to the right, last cast on stitch on the top and first cast on stitch on the bottom, being sure that the first cast on group of the second sock is on the same needle as the first cast on group of the first needle. This is another place where the stitch marker I put in when I cast on the first sock comes in handy � I know that it is after the first stitch I will knit so that is the needle I have to put the group of stitches with the first cast on stitch on for the second sock (picture 8 shows transferring the first group of stitches, picture 9 shows how the socks sit after all the stitches are transferred).

Picture 8

Picture 9
NOTE: If you are not doing a cast on which has your both ends of the yarn together when you finish casting on your �tail� will be at the first cast on stitch and the thread you will be working with is at the last cast on stitch. Watch this when you are casting on the second sock and/or moving the cast on stitches but that type of cast on is not recommended, as it is not very stretchy. I have not included pictures with this type of cast on for this reason.
Look again at picture 9. This is how your work should look at this point if you moved the second sock to the other end of the needle. If you did not move that sock the marker will be on the sock on the right. That is the only difference at this point. If it does not look like this go back and review the lesson to this point and feel free to ask questions about what the difference is.
Now you are ready to start your knitting. Remember that the stitches on the needle with the marker will become the sole stitches and the stitches on the other needle will become the instep stitches. From now on I will refer to the stitches as the sole stitches and the instep stitches. You will be working in the following order, remembering to change which strand of yarn you are using each time you switch from sock 1 to sock 2 or sock 2 to sock 1. You do not switch yarn when you go from the sole of sock 2 to the instep of sock 2 or from the instep of sock 1 to the sole of sock 1. The point to remember is that you switch either working yarn or needles not both at the same time. You will work the sole stitches of sock 1, switch yarn, work the sole stitches of sock 2, flip the needles, work the instep stitches of sock 2, switch yarn, then the instep stitches of sock 1, flip the needles and start again. Think this will be too confusing � then remember the suggestion to work the two socks in different colors to start. This will remind you which strand of yarn you should be using.
Hold the needle with the first cast on stitches on it (if you used a stitch marker the needle with the stitch marker is the one I am talking about) in your left hand. If you switched position of the socks so that you are starting with the sock you cast on second the marker will be towards the middle. You can take the marker out when you get to it and put it at the beginning of this group of stitches when you get back to this point, or you can leave the marker where it is. It is just a tool to help you remember which group of stitches will become the sole stitches. You should be holding the end that has the strand of yarn leading to your ball of wool at the tip, and there is another strand of yarn hanging down at the edge of the next group of stitches. For the first row the strand of yarn for the second sock may be coming out between the needles � don�t worry about it. You will fix it as you get to it (or when you finish the second side of that sock). I work with both my working yarn and the tail for the first 4-6 stitches so that I don�t have to work the tail in as much later on. I don�t find this to be a problem or noticeable later on. I suggest you work a K2, P2 rib for these socks. You can use a different rib if you choose or are more comfortable if it will work into the number of stitches you cast on. So � what are you waiting for � knit the first row of ribbing. Remember to change yarns when you start the second sock.

Picture 10
Now working K2, P2 across each group, work the sole stitches of sock 1, switch yarns (if the new yarn is between the needles pull it out foreword and flip it around the needles so it ends up over the needles to the back of the work, if working from both ends of the ball of yarn and this will tangle it more-leave it alone and when you get to the other side you can put it where it belongs). Whenever you are finished using a strand of yarn place the yarn over the other needle so it is out of the way and does not end up between the needles. Also be careful not to pass the yarn over the needle tip as this will result in a yarn over which will cause one of two problems on the next row � either you will forget that this is not a stitch and knit it (increasing your stitch count) or you will have extra thread when you drop it. Work the sole stitches of sock 2. Pull/push the stitches onto the cable of the needle you have just worked across. Now you get to turn the needles. The impulse is to just turn the needles counterclockwise. This will usually result in increased twisting of your threads. Instead turn your needles clockwise (yes this is the longer way to go but it makes it easier in the long run) and dip the needle ends UNDER the strands of yarn attached to the ball as often as needed to counteract the twisting. How often you need to do this depends on numerous factors including if you are using one ball of wool or two and how the ball is wound. Pull the strands so that they are again towards the back of the work. Move the stitches on the new needle to the tip of the needle, grab the needle tip that is hanging the lowest (and it will be the longest one if you moved the stitches on the other needle to the middle of the cable of that needle) and you are ready to go. Look at Picture 10 again and you can see that the end of the needle you are going to work with is hanging down the longest. Pick up the strand you were working with and knit the instep stitches of sock 2, switch yarns and knit across the instep stitches of sock one. Move the stitches you just worked on to the cable of the needle.
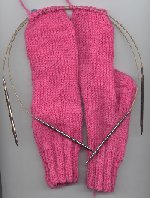
Knitting Cuff and LegWell � you have started doing it so keep on repeating the last group of instructions. You should be working in a K2, P2 rib and will work around and around and around in rib for 2� for the child�s sock we are making (if you are using a different pattern follow the directions for your pattern). Then work 2 inches of stockinettte stitch for a total leg length of 4 inches (or whatever your pattern calls for). Remember that for circular knitting that means to knit each row (yes I know that I said this was not a basic knitting class so ignore this type of directions if you don�t need them. For some they have never knit circularly before and they will need these directions). If you are knitting a short row heel stop working here and rejoin the class next week for directions on turning the heel (but do read on so that you know what to do if/when you do a sock with a flap and gusset). If working a heel flap and gusset continue onto the next section.
At some point did you end up as in this picture? Don�t worry - it happens to everyone at some point � you forgot to switch yarns when you went from sock 1 to sock 2. Just TINK (knit backwards taking out the row just done) the sock (both sides) that you just worked and go on.

Picture 11
Working the Heel Flap
The heel flap is worked on half the stitches � the stitches that have been designated the sole section of the socks. Didn�t remember to put a stitch marker in and don�t remember which stitches are the sole stitches and which are the instep stitches? Don�t worry � just make a choice. In the long run it won�t matter if the front or the back is an extra row. If you can�t tell by looking at it who will? And do you think you will obsess about it? If you think you will then just remember two things: first - if you are making a pair of socks for a child they will love them and won�t know unless you tell them � and why spoil their enjoyment, and secondly � if it bothers you that badly then frog the whole thing and start over. It will give you more practice and you probably need it anyway if you have nothing else to do but obsess over it. J
You will be knitting one way and purling back the other way for the heel flap. In order to make it easier to pick up the stitches for the gussett ALWAYS slip the first stitch as if to purl with the yarn in the front of the work and ALWAYS knit the last stitch of the row. This makes the stitches easier to work with when you go to pick up the gussett stitches.
Row 1: Slip 1 as if to purl with yarn in front, *knit 1, slip 1 as if to purl (with yarn in back), repeat from * across ending K1
Row 2: Slip 1, purl across to end stitch, Knit 1Repeat these two rows until you have worked 16 rows (there will be 8 long stitches on the sides of the flap)
Well that�s it for this week. As usual feel free to post questions and comments and I will answer as soon as I can. Homework for this week is to get to this point and come ready to turn you heel, pick up the gussett stitches and work the foot of the sock to the toes next week.
![]()