Cybersocks
Argyle Sock
On-line Socknitting Classes with
Edie Eckman
Lesson Three - Duplicate Stitch

![]()
Lesson Three
Now it’s decision time. If you worked your diagonal lines in with your knitting, you won’t have much to do in Lesson Three. If you still need to duplicate stitch the lines, now is a good time.
Either way, you can choose to do Lesson Three now, or skip straight to Lesson Four, then come back and do Lesson Three. (You’ll have to wait until Lesson Four is posted in a day or two.)
I never can decide whether I like to sew up the sock first, then finish the foot, or finish the foot, then sew up the seams. Maybe you will want to try one sock one way and the other the other way, and see which way you prefer.
*************************
You now have a strange-looking piece of knitting with lots of holders and too many ends hanging out the back, right?
If you are a perfectionist, you have already frogged your knitting and fixed your mistakes. However, if you made any mistakes in your intarsia work, now is the time to fudge them by duplicate stitching over the mistake in the color you should have used on that stitch. (See below for description of duplicate stitch.)
Finish off the ends of MC and B that you have hanging from your work, with four exceptions. These exceptions are:
- The MC strand hanging at the corner of your cast-on edge
- The B strand at the edge of Row 1 (or Row 36 or both)
- The MC strands at the corner of your instep , where you started picked up along the side of the heel for the gusset shaping
- The MC strand connecting your work to the ball of yarn.
If you have already knit in your diagonal lines, skip to Lesson Four.
Following Graph B, duplicate stitch lines using C. Finish off ends of C.
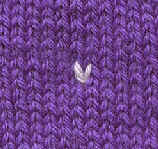
Wordy how-to’s for duplicate stitch novices: Holding your sock right side up (as you will wear it), take a look at it. Do you see rows and columns of tiny V’s marching across the fabric? Good.
Now hold the sock upside down (with the cast-on edge at the bottom). Do you see similar rows and columns of tiny V’s marching across the fabric? Fine.
If you look carefully, you will see that you have V’s going both ways-up and down. The \ of the V when the sock is held one way is the / of the V when you turn the sock upside down. See what I mean with this little diagram?
We are interested in the V’s as they appear when the sock is held as it has been as you worked on it so far-with the cast-on edge pointed towards the floor. Don’t get confused and start working with the V’s going the other way.
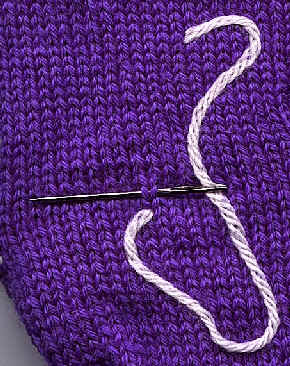
To duplicate stitch, thread a length of yarn (color B) through your tapestry needle. Referring to the graph, find the stitch that you want to cover. For our purposes, call this the "base" stitch. It will be a V. Bring your needle from the back of the fabric up through the base of this V and pull the yarn through, leaving a 4-6" tail hanging in the back.
Now look at the path the yarn of the base stitch takes. It goes around through the base of the V above it and back out the other side. **** Insert your tapestry needle so that it follows the path of the base stitch yarn-down into the fabric on one side of the V above your stitch, and out back the other side of that V, but instead of going "down" and "up", do it in one motion as you do when you are sewing.
 Pull
yarn through – not too tight or too loose, but matching the tension of the
base stitch. Insert tapestry needle down into base of same V you started on
and pull to back. You have now made your first duplicate stitch. See how the
new color covers the base stitch?
Pull
yarn through – not too tight or too loose, but matching the tension of the
base stitch. Insert tapestry needle down into base of same V you started on
and pull to back. You have now made your first duplicate stitch. See how the
new color covers the base stitch?
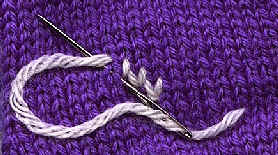
From here on out, you will need to identify the base of the V’s that will be making your diagonal line, so that you are starting one stitch up (or down) and over from the one you just completed. With practice, you will be able to finish one duplicate stitch and start the next in one motion, thus keeping your tapestry needle at the front of your work at all times-much easier than going from the front to the back of the work all the time.
****Off-topic note: Once learn the path the yarn takes and understand how the stitches relate to one another, you will be able to fix almost any mistake without having to rip it out and re-knit.
![]()